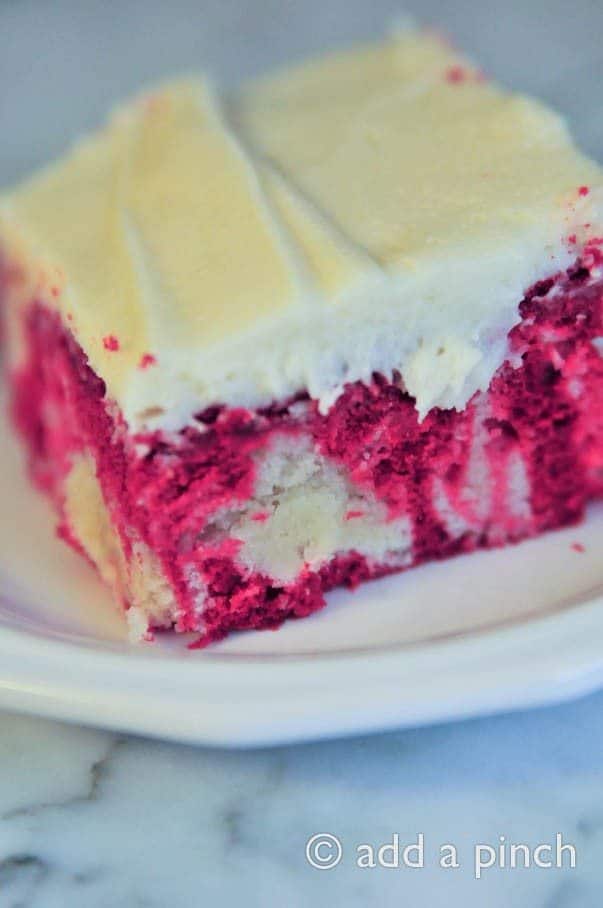
Red Velvet Marble Cake Recipe
This post may contain affiliate links. Please read my disclosure policy.
Red Velvet Cake takes a place of stature here in the south. It is sure to be a part of plenty of Christmas dessert buffets and always seems to be one of the first cakes to disappear.
But, there is another way that I love Red Velvet Cake that I think you’ll enjoy, too.
A Red Velvet Marble Cake.

Oh yeah, it’s good.
With a generous spread of cream cheese frosting on the top and a cold glass of milk or hot cup of coffee, it’s pretty amazing actually.
No fiddling with layers and crumb coats.
Just pure deliciousness.

My recipe for Red Velvet Marble Cake is the perfect answer for those Christmas parties or other get togethers where you want to serve something just a little bit different from the classic recipes, but with a nod to the tradition.
And you know, I’m thinking it might be just perfect for Valentine’s Day, too.
Here’s my Red Velvet Marble Cake Recipe. I hope you love it!
Get This Recipe In Your Inbox
Share your email, and we'll send it straight to your inbox. Plus, enjoy daily recipe inspiration!
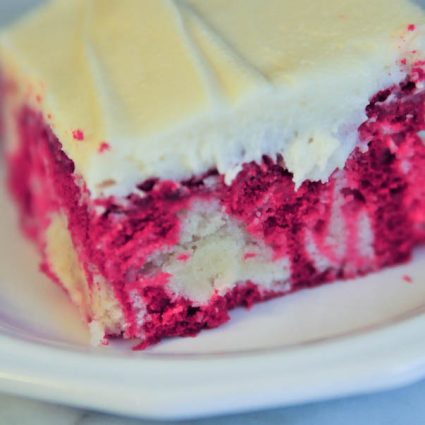
Red Velvet Marble Cake Recipe
Ingredients
For the Red Velvet Batter
- 1/4 cup (46 g) shortening
- 1 cup (198 g) sugar
- 1 large (50 g) egg
- 1 ounce (28 g) red food coloring
- 1 tablespoon (5.25 g) unsweetened cocoa powder
- 1 1/2 cups (180 g) all-purpose flour, (spoon + level)
- 1/2 teaspoon (1.3 g) kosher salt
- 1 teaspoon (4.7 g) vanilla extract
- 1/2 teaspoon (3 g) baking soda
- 1/2 cup (113.5) buttermilk
- 2 teaspoons (10 g) vinegar
For the Butter Cake Batter
- 1 cup (226 g) butter, softened
- 2 cups (240 g) all-purpose flour
- 2 teaspoons (9.4 g) vanilla extract
- 2 cups (396 g) sugar
- 4 large (200 g) eggs
- 1/2 teaspoon (1.3 g) kosher salt
- Cream Cheese Frosting
Instructions
- Preheat oven to 350 degrees.
- Prepare 9 x 13 baking pan with butter and flour or a baking spray.
For the Red Velvet Batter
- Cream together vegetable shortening, sugar and eggs.
- Make a paste of food coloring and cocoa and add to mixture.
- Add salt and flour with buttermilk and vanilla.
- Alternately add soda and vinegar; just blend, don’t beat hard.
For the Butter Cake Batter
- In a separate bowl, cream together butter, sugar, and vanilla until creamy.
- Add eggs one at a time, beating well after each addition.
- Add flour and salt, mix well.
For the Red Velvet Marble Cake
- Spread red velvet cake batter across bottom of prepared baking pan.
- Add dollops of butter cake batter alternately across red velvet cake batter.
- Run knife through batter to marbleize.
- Bake 45-50 minutes at 350º or until toothpick or cake tester inserted into the center comes out clean. You can follow my tips for how to tell when your cake is done.
- Remove from oven and allow to cool completely.
- Top with Cream Cheese Frosting
Notes
Nutrition
Nutrition information is automatically calculated, so should only be used as an approximation.
Enjoy!
Robyn xoxo


I tried this recipe twice both times it rose too high and was dry it didn’tlook at all like picture I would love to have it come out like picture I followed directions precisely and kept close eye on baking time so as not to overtake but it ended up dry ☹️
Would this be an easy recipe to make into cupcakes?
Hi Robyn! What would be the best substitute for vegetable shortening?
Hello!
These look pretty! Can I know what colors u used? The red looks pretty fuscia! I love it
Xox,
fatima